Factor/Component Column Options
Right-clicking on the column header of any factor or component brings up the following options:
Edit Info: The Edit Info dialog allows you to edit the Factor name, units, number of levels (for categorical factors), number format and actual factor or component settings.
Tip: If, after setting up a design, you want to change factor low levels or high levels, do this through Edit Info. Do not change the individual values in the data area of the design layout. First of all, that is a lot more work, and more importantly, it will not give you the results you expect; your new highs and lows will not be equated correctly to the -1 and +1 coded levels. All your data will be treated as botched design data.
Make Categoric or Make Numeric: (Factor Only)
When changing a factor from Categoric to Numeric the categoric levels must be numbers or an error message will be presented. The choice of type (Continuous vs. Discrete) will have no impact on the analysis. Discrete levels will impact what levels can be used for augmenting the design and can be used to restrict the optimization solutions during post analysis work. After converting a factor from categoric to numeric, responses are analyzed using response surface methods (polynomial model), rather than a factorial interaction model.

When changing a numeric factor from Numeric to Categoric: You will have the choice of Nominal or Ordinal categoric levels. Nominal is used when the level names can be entered in any order, they are just names (batch number, product ID, etc.). Ordinal is used when the factor is numeric and ordering of the levels is important, such as 10, 20, 30. A unique level will be generated for each different numeric value.

Insert Factor: Adds a factor to a design. By default the new factor is assumed to be numeric and has a range from -1 to +1. To change to categoric right-click the new factor’s column header and set it to categoric. To set different treatment levels, right-click the new factor’s column header and choose Edit Info. The setting used up to this point must me manually entered.

Ignore Factor: Temporarily removes a factor from consideration, effectively making it a constant. Any model that is fit will be lost. Responses with simulations can still access the ignored factor as input, but the factor will not be available to the analysis. Use Restore Factor to return ignored factors to the analysis.
Delete Factor: Permanently removes a factor from the design. Typically used when a factor is shown to have no effect on any response and there is a plan to augment the existing design to fit a higher order model. Removing the factor causes the augment to require fewer runs.
Recode Factor: (Numeric factors only) Re-centers the coding around the average factor setting. A typical use is to fixed botched data entry.
Mixture components cannot be manually inserted, ignored, deleted or recoded, They are automatically ignored if they are set to a constant when the design is built.
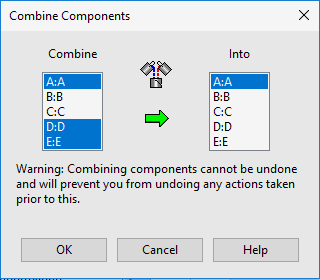
Combine Components: (Mixture Component Only) If several components belong to the same family of ingredients, for example various forms of sugar in a food formulation. Right-click on any component column heading and select Combine Components to bring up the dialog box.

Hold down the CTRL key to select multiple components on the Combine side. On the Into side, click one component to receive them. Press OK to proceed.
Note
Save your file before combining components. Use Ctrl+Z to undo the combine.
Switch Coding: The underlying coding used to analyze mixture designs is called pseudo coding. There are two types, L_pseudo for lower bounded regions (default), and U_pseudo for upper bounded regions. The software automatically detects which type of coding will work best for each mixture experiment. This option allows the analysis to toggle between L and U_pseudo. Switching the coding removes any analysis progress.
Sort: Ascending puts the low value on the top of the spreadsheet, Descending puts the high value on the top of the spreadsheet. ALL columns in the design will be sorted together. Selecting multiple columns sorts from left to right.